Todo App Vue 3
Simple todo application built with Vue 3 and Vite for task management
Share this project:
Project Overview
Simple Todo App with Vue 3
A clean and functional todo application built with Vue 3 and Vite, featuring modern reactive patterns and a responsive user interface for efficient task management.
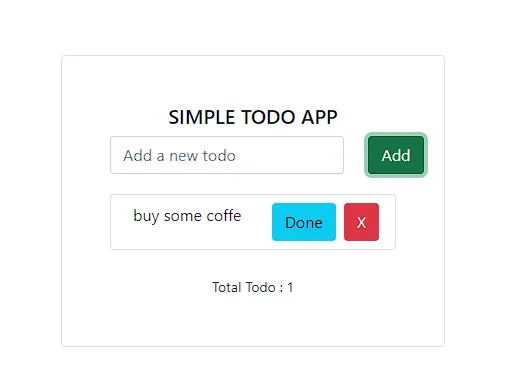
📋 Overview
This is a simple todo application repository built with Vue 3, showcasing the Composition API and modern Vue features powered by Vite's lightning-fast development environment.
✨ Features
-
Task Management
- Add new todos
- Mark completed tasks
- Delete todos
- Edit existing tasks
-
Modern Vue 3
- Composition API
- Reactive data handling
- Component-based architecture
-
User Experience
- Clean, intuitive interface
- Responsive design
- Smooth animations
- Local storage persistence
-
Fast Development
- Vite for instant HMR
- Lightning-fast builds
- Optimized production bundle
🛠️ Technologies Used
- Vue 3: Progressive JavaScript framework
- Vite: Next-generation frontend tooling
- JavaScript (ES6+): Modern JavaScript features
- CSS3: Styling and animations
- Local Storage: Data persistence
📁 Project Structure
todo-app-vue-3/
├── src/
│   ├── components/        # Vue components
│   │   ├── TodoList.vue
│   │   ├── TodoItem.vue
│   │   └── TodoForm.vue
│   ├── composables/       # Reusable logic
│   ├── assets/           # Static assets
│   ├── App.vue          # Root component
│   └── main.js          # Application entry
├── public/              # Public static files
├── index.html          # HTML template
├── vite.config.js      # Vite configuration
├── package.json        # Dependencies
└── README.md
🚀 Getting Started
System Requirements
- Node.js v18.0.0 or higher
- npm or yarn package manager
- Git Bash (for Windows) or Unix terminal
Installation Steps
-
Clone the Repository
git clone <repository-url> cd todo-app-vue-3 -
Install Dependencies
Using npm:
npm installIf you encounter dependency issues, use:
npm install --legacy-peer-depsOr using yarn:
yarn install -
Start Development Server
Using npm:
npm run devUsing yarn:
yarn dev -
Access the Application
Open your browser and visit:
http://localhost:5173(Port may vary - check console output)
💻 Usage
Adding a Todo
- Type your task in the input field
- Press Enter or click Add button
- Todo appears in the list
Completing a Todo
- Click the checkbox next to a task
- Task marked as completed (strikethrough)
- Move to completed section
Editing a Todo
- Double-click on a task
- Edit the text
- Press Enter to save
Deleting a Todo
- Click the delete button (×) on a task
- Task removed from list
Filtering Todos
- All: Show all todos
- Active: Show incomplete todos
- Completed: Show finished todos
🎨 Features in Detail
Vue 3 Composition API
<script setup>
import { ref, computed} from 'vue'

const todos = ref([])
const newTodo = ref('')

const addTodo = () => {
  if (newTodo.value.trim()) {
    todos.value.push({
      id: Date.now(),
      text: newTodo.value,
      completed: false
    })
    newTodo.value = ''
  }
}

const activeTodos = computed(() =>
  todos.value.filter(todo => !todo.completed)
)
</script>
Local Storage Persistence
Todos are automatically saved to browser local storage:
- Data persists across page reloads
- No backend required
- Instant synchronization
Reactive Updates
All changes reflect immediately in the UI thanks to Vue's reactivity system.
🔧 Available Scripts
# Development server with hot reload
npm run dev

# Build for production
npm run build

# Preview production build
npm run preview

# Run linter
npm run lint

# Fix linting issues
npm run lint:fix
📦 Build for Production
# Create optimized production build
npm run build

# Preview production build locally
npm run preview
Output in dist/ folder ready for deployment.
🌐 Deployment
Vercel
npm install -g vercel
vercel
Netlify
- Drag
dist/folder to Netlify - Or connect Git repository
GitHub Pages
npm run build
# Deploy dist/ folder
🎓 Learning Concepts
This project demonstrates:
- Vue 3 Composition API: Modern reactive patterns
- Component Design: Reusable UI components
- State Management: Local state handling
- Event Handling: User interactions
- Computed Properties: Derived state
- Lifecycle Hooks: Component lifecycle
- Local Storage API: Browser storage
- Vite Configuration: Modern build tool
🔧 Configuration
V custom configuration
// vite.config.js
import { defineConfig } from 'vite'
import vue from '@vitejs/plugin-vue'

export default defineConfig({
  plugins: [vue()],
  server: {
    port: 3000 // Custom port
  }
})
🎨 Customization
Styling
Edit component styles or use Tailwind CSS:
npm install -D tailwindcss postcss autoprefixer
npx tailwindcss init -p
Features to Add
- Dark mode toggle
- Categories/tags
- Due dates
- Priority levels
- Search functionality
- Drag and drop
- Export/import todos
- Backend synchronization
🐛 Troubleshooting
Vite Not Starting
- Check Node.js version (18+)
- Clear npm cache:
npm cache clean --force - Delete
node_modulesand reinstall
HMR Not Working
- Restart dev server
- Check browser console
- Verify Vite configuration
Build Errors
- Run
npm run buildand check output - Fix any TypeScript/linting errors
🤝 Contributing
Contributions welcome! Feel free to:
- Report bugs
- Suggest features
- Submit pull requests
- Improve documentation
📄 License
This project is open source and available under the MIT License.
🌟 Acknowledgments
- Built with Vue 3 and Vite
- Inspired by TodoMVC
- Community contributions welcome
Happy Task Managing! ✓✨
Simple, effective todo list with Vue 3!