WebSocket Chat Server
Real-time chat server built with Go and WebSocket for learning real-time communication
Share this project:
Project Overview
WebSocket Chat Server (Go)
A real-time chat server implementation built with Go and WebSocket protocol. This learning project demonstrates how to build WebSocket-based applications for real-time bidirectional communication between clients and server.
📋 Overview
This is a practice project focused on learning WebSocket implementation in Go. It creates a simple chat server where multiple clients can connect and send messages to each other in real-time. The project is inspired by this excellent tutorial.
Note: This repository contains only the server-side implementation. Client-side testing can be done using tools like Postman, wscat, or any WebSocket client.
✨ Features
- Real-time Messaging: Instant message delivery to all connected clients
- WebSocket Protocol: Efficient bidirectional communication
- Multiple Clients: Support for simultaneous connections
- User Identification: Name-based client identification
- Broadcast System: Messages sent to all connected users
- Connection Management: Handle client connect/disconnect events
- Simple REST API: WebSocket upgrade endpoint
🛠️ Technologies Used
- Go (Golang): Server-side programming language
- Gorilla WebSocket: WebSocket library for Go
- WebSocket Protocol: Real-time communication protocol
- HTTP: For initial connection upgrade
📁 Project Structure
learn-websocket-go/
├── main.go              # Main server file with WebSocket handling
├── go.mod              # Go module dependencies
├── go.sum              # Dependency checksums
└── README.md
🚀 Getting Started
Prerequisites
- Go 1.18 or higher installed
- Basic understanding of WebSocket protocol
- WebSocket client for testing (Postman, wscat, or browser)
Installation Steps
-
Clone the Repository
git clone <repository-url> cd learn-websocket-go -
Install Dependencies
go mod downloadOr let Go handle it automatically:
go run main.go -
Run the Server
go run main.goThe server will start on
http://localhost:9000
💻 Usage Guide
Testing with Postman
-
Open Postman
-
Create New WebSocket Request
-
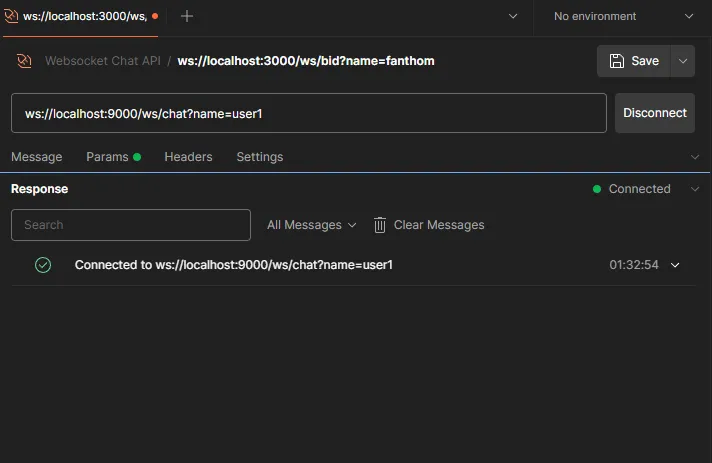
Connect to WebSocket
- URL:
ws://localhost:9000/ws/chat?name=yourname - Important:
nameparameter must not be empty!
Example URLs:
ws://localhost:9000/ws/chat?name=John ws://localhost:9000/ws/chat?name=Alice ws://localhost:9000/ws/chat?name=Bob - URL:
-
Click "Connect"
-
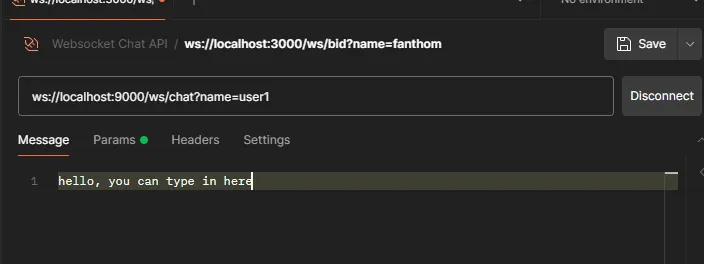
Send Messages
- Type your message in the message field
- Click "Send"
-
Open Multiple Connections
- Repeat steps 2-4 with different names
- Observe real-time message broadcasting
-
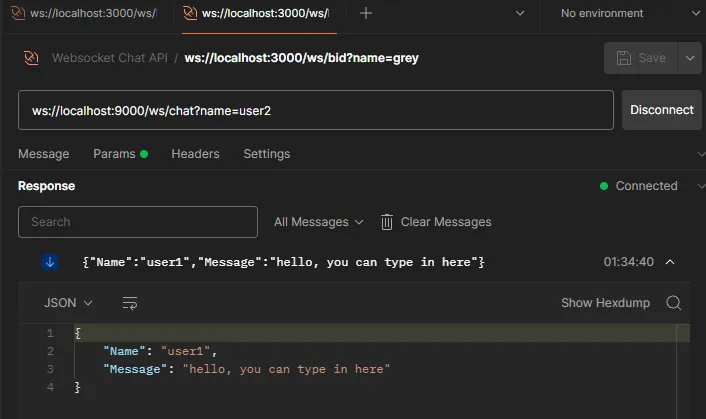
See the Magic!
Messages from User1 are broadcast to all connected users, including User2!
Testing with wscat (Command Line)
Install wscat:
npm install -g wscat
Connect and chat:
# Terminal 1 - User 1
wscat -c "ws://localhost:9000/ws/chat?name=Alice"
> Hello everyone!

# Terminal 2 - User 2
wscat -c "ws://localhost:9000/ws/chat?name=Bob"
> Hi Alice!
Testing with Browser JavaScript
<!DOCTYPE html>
<html>
<body>
    <input type="text" id="message" placeholder="Type message...">
    <button onclick="sendMessage()">Send</button>
    <div id="messages"></div>

    <script>
        const ws = new WebSocket('ws://localhost:9000/ws/chat?name=WebUser');

        ws.onmessage = (event) => {
            const messagesDiv = document.getElementById('messages');
            messagesDiv.innerHTML += '<p>' + event.data + '</p>';
        };

        function sendMessage() {
            const input = document.getElementById('message');
            ws.send(input.value);
            input.value = '';
        }
    </script>
</body>
</html>
📡 WebSocket Endpoint
Connection
WS /ws/chat
Query Parameters:
name(required): Username for the chat participant
Example:
ws://localhost:9000/ws/chat?name=JohnDoe
Message Format
Messages are sent as plain text strings. The server broadcasts each message to all connected clients.
Send:
Hello, everyone!
Receive:
JohnDoe: Hello, everyone!
🔧 Code Structure
Main Components
-
WebSocket Upgrade Handler
- Upgrades HTTP connection to WebSocket
- Validates query parameters
- Manages connections
-
Message Broadcaster
- Distributes messages to all clients
- Handles message formatting
- Manages client list
-
Connection Pool
- Tracks active connections
- Handles user join/leave events
- Cleanup on disconnect
🎓 Learning Concepts
This project demonstrates:
- WebSocket Protocol: Understanding upgrade mechanism
- Concurrent Programming: Using Go goroutines for multiple connections
- Real-time Communication: Bidirectional data flow
- Connection Management: Handling connect/disconnect events
- Broadcasting: Sending messages to multiple recipients
- Query Parameters: Extracting data from WebSocket URLs
💡 Examples
Simple Chat Flow
- Alice connects:
ws://localhost:9000/ws/chat?name=Alice - Bob connects:
ws://localhost:9000/ws/chat?name=Bob - Alice sends: "Hello!"
- Bob receives: "Alice: Hello!"
- Bob sends: "Hi Alice!"
- Alice receives: "Bob: Hi Alice!"
🐛 Troubleshooting
Connection Refused?
- Ensure server is running
- Check port 9000 is not in use
- Verify correct URL format
Name parameter missing error?
- Always include
?name=yournamein URL - Name cannot be empty (username must not be empty)
Messages not broadcasting?
- Check multiple clients are connected
- Verify WebSocket connection is established
- Check server console for errors
🚀 Future Enhancements
Potential improvements:
- Private messaging between users
- Chat rooms/channels
- Message history/persistence
- User authentication
- Typing indicators
- Online users list
- File sharing
- React/Vue frontend client
- Message encryption
📚 Resources
🙏 Acknowledgments
This project was inspired by and built following the tutorial at: https://youtu.be/BcuXtC4afzU?si=HPjwiARhpeWNKWOL
Thanks to the creator for the excellent learning resource!
🤝 Contributing
This is a learning project. Feel free to fork, experiment, and enhance!
📄 License
Open source - available for educational purposes.
Happy WebSocket Learning! 🚀💬
Real-time communication made simple with Go!